This is a guide that shows how to install Monta on your charge point. Indra charge points come preconfigured with Monta. This means that you just need to connect the charge point to the internet and then to your Monta account.
Please note that when you connect your charge point to Monta, we become the operator of the charge point. This means that you need to use Monta to control the charging process.
WiFi connection
Notes
- The Wi-Fi dongle connects a Wi-Fi router via the WPS function. If the router doesn’t have a WPS button, you can use a Wi-Fi extender that has a WPS button on it.
- Before you connect the charge point to Wi-Fi you need to check the speed of your internet connection. This can be done by connecting a phone or a Tablet to the Wi-Fi and running a signal speed checker. The Indra Smart Pro charge point requires a minimum of 10Mbps.
Locate the WiFi dongle
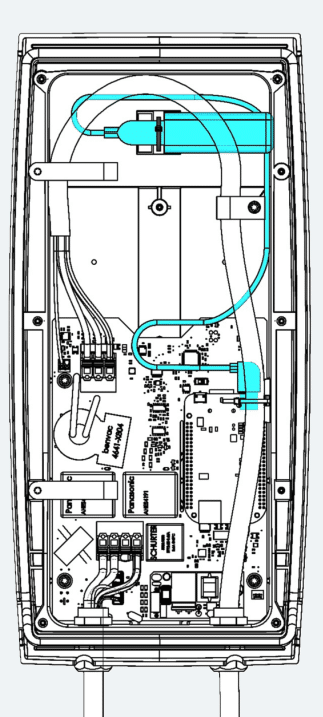
Open the charge point box and identify the Wi-Fi dongle, as shown on the illustration below.

Connect the USB cable into the Beaglebone
Connect the USB cable supplied with the dongle into the Beaglebone as shown on the figure above. Connect the dongle and place it in the recess on the accessory tray and secure with the supplied tie wrap.
Record the WCD number of the dongle
This number can be useful for troubleshooting later on.
Close the charge point box
Now you can close and seal the charge point box to proceed and pair it to Wi-Fi.
Wi-Fi Pairing
1. Press and hold the BOOST button until the Main LED turns Orange.
2. Release the BOOST button (before it turns Green).
3. Set Router to WPS mode (refer to Router instructions on how to do so).
Note: The above routine times out in 2 minutes and the LED will turn Red if unsuccessful
4. The main LED will Flash Orange whilst Pairing is taking place.
5. If pairing is successful, the main LED will flash Green for 5 seconds, before reverting to its last state, whether awaiting commissioning (Purple) or successfully commissioned (White).
4G connection
Notes
- Check the speed and strength of the 4G signal at the charge point location. This can be done by using a signal strength tester. The Smart PRO requires a minimum speed of 10Mbps.
- Please make sure that you have a compatible sim when inserting the 4G dongle.
- 4G internet signal strength can vary based on usage in the area, provider maintenance, and, in some extreme cases, the weather. This means that 4G connectivity can be unreliable in some circumstances.
Locate the 4G dongle
Open the charge point box and identify the 4G dongle, as shown on the illustration below.

Connect the USB cable into the Beaglebone
Connect the USB cable supplied with the dongle into the Beaglebone as shown on the figure above. Connect the dongle and place it in the recess on the accessory tray and secure with the supplied tie wrap.
Record the WCD number of the dongle
This number can be useful for troubleshooting later on.
Close the charge point box
Now you can close and seal the charge point box to proceed and pair it to 4G.
4G pairing
Once powered up, the 4G dongle will find the strongest signal network it can. If the signal strength is strong enough, the charge point will indicate it is connected to the internet by either going Purple with a single flash (awaiting commissioning) or solid White (successfully commissioned).
Connect the charge point to your Monta account
Now you need to add and connect your charge point to your Monta account.
You can do this through either Monta Charge or Monta Hub.
While connecting the charge point to Monta, you need to select the “OCPP” method of connection. Afterwards, you need to insert the serial number of the charge point.
The serial number is the MAC address, which is located on the side of the unit.
