
Learn how to add and connect multiple charge points at once in Monta Hub using a CSV import and installer job — suitable for charge point operators (CPOs) with large sites.
For: Charge point operators (CPOs) and site owners using Monta Hub with large deployments.
Bulk import adds many charge points (EVSEs) at once. You fill in a spreadsheet-style grid in Monta Hub, one row per EVSE, either by hand, by pasting, or by uploading a CSV file. Monta Hub checks every row before you import, and shows the result for each row afterwards.
How do I open bulk import?
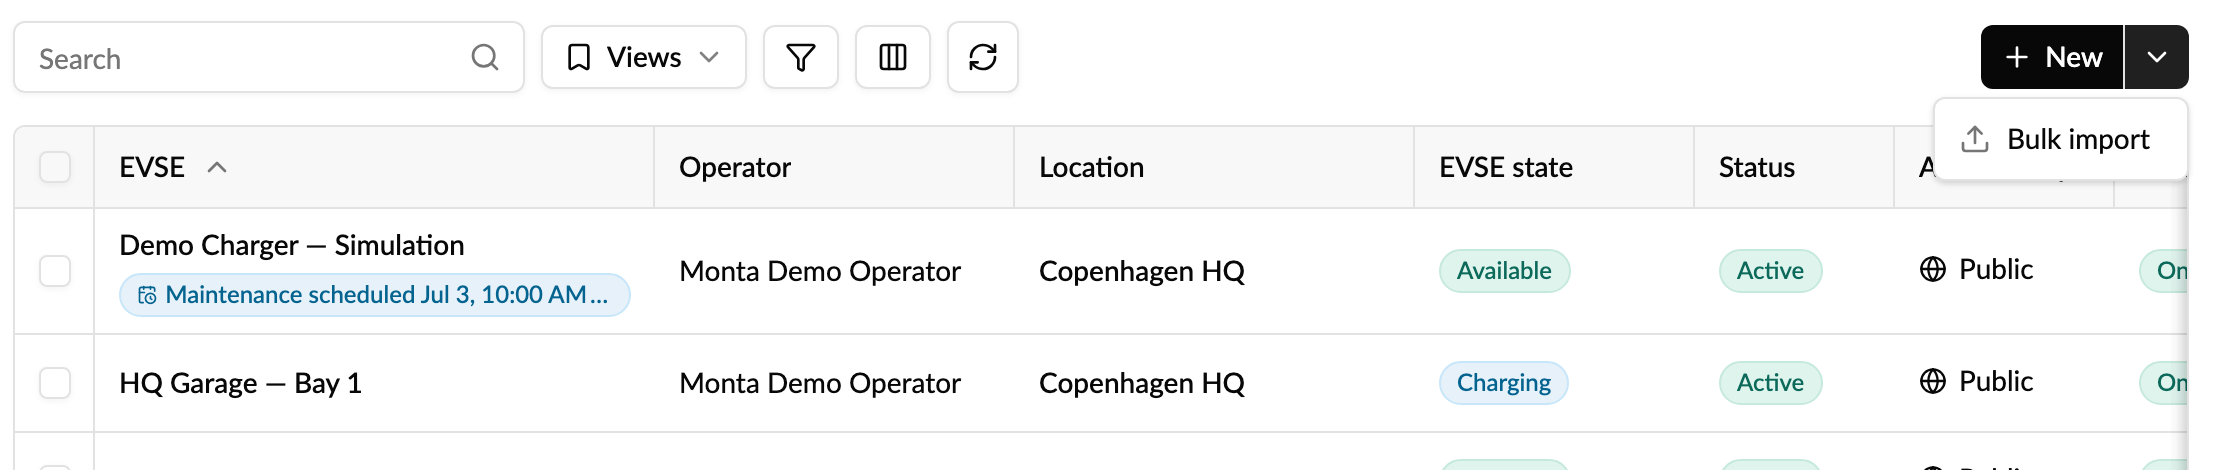
- From Network: go to CPO / Network → Network, open the EVSE tab, click the arrow next to New and choose Bulk import.
- From an account: open the account, go to its Network tab, click the arrow next to New and choose Bulk import EVSEs.
You need permission to create EVSEs.
How do I add the rows?
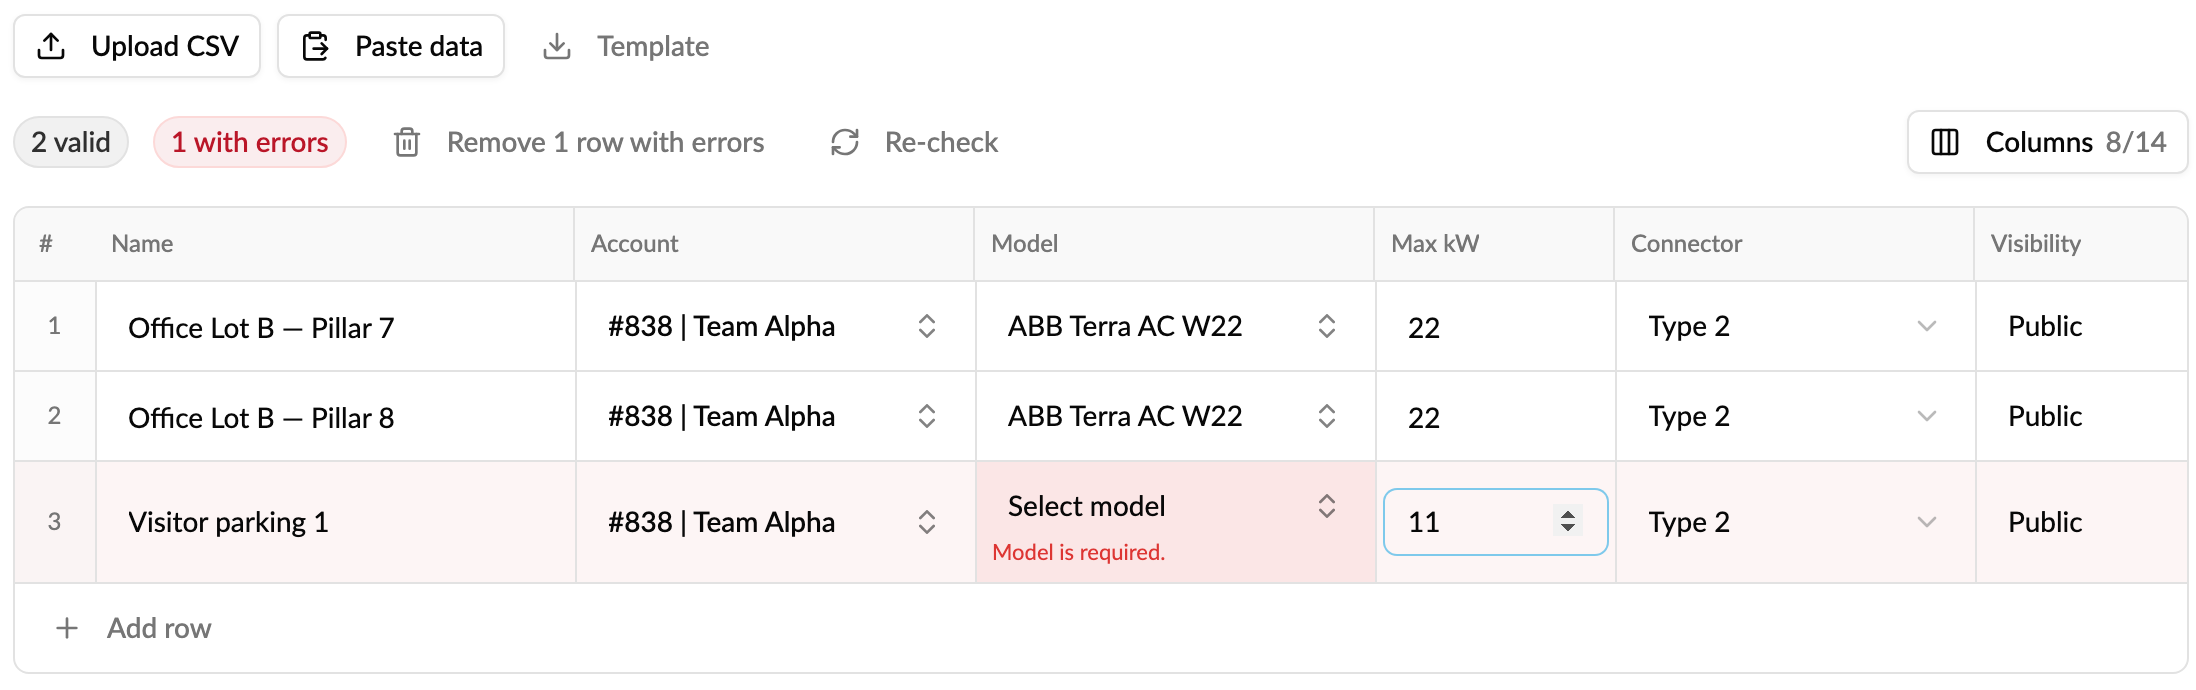
Bulk import opens straight into an empty grid. Add rows in any of these ways, and mix them as you like:
- Add row: fill in a row by hand.
- Upload CSV: upload a .csv or .txt file. Each upload is added below the rows already in the grid.
- Paste data: paste rows copied from a spreadsheet, then click Add.
-
Template: download
charge_point_import_template.csvwith the column headers and example rows.
Which columns are there?
The grid shows the most-used columns. Click Columns to show the others. In a CSV file, use the header name in the last column (headers aren't case-sensitive, and spaces, dashes and underscores are ignored, so connector_id and Connector ID both work).
| Column | What to enter | CSV header |
| Name | Required. Up to 128 characters. | name |
| Account | Required. Pick the account, or the account ID in a file. |
teamId or team
|
| Model | Required. Pick the brand and model, or the model ID in a file. |
chargePointModelId, modelId or model
|
| Max kW | Required. A number, for example 22. Use a decimal point, not a comma. |
maxKw or kw
|
| Connector | The plug type. See below. Defaults to Type 2. |
connectorId or connector
|
| Visibility | Public or Private. Defaults to Public. | visibility |
| Location (existing) | Pick one of the account's locations, or the location ID in a file. |
siteId or site
|
| Location (address) | An address, used when the EVSE isn't on an existing location. |
address, location or locationId
|
| Location name (hidden) | A name for a new location at that address. | siteName |
| Active (hidden) | Yes or No. Defaults to No. In a file, write true for Yes. |
active |
| Show on map (hidden) | Yes or No. Defaults to No. In a file, write true for Yes. |
showOnMap |
| EVSE ID (hidden) | The roaming identifier, for example DK*MON*E12345 (in capitals). Leave blank and Monta generates one. Must be unique in your network; the EVSE ID of a deleted charge point in the same account can be reused. |
evseId |
| OCPP identifier (hidden) | The charger's OCPP identity, for example CP-001. Letters, digits and . : _ -, up to 64 characters. |
ocppIdentity, ocppIdentifier or chargeBoxIdentity
|
| Connector ID (hidden) | The socket number on that charger, from 1 to 99. Needs an OCPP identifier if it's anything other than 1. |
ocppConnectorId or connectorIndex
|
The Connector column
Connector is the plug type of the EVSE. In the grid, pick it from the dropdown. The list shows the plug types Monta supports, such as Type 2, CCS and CHAdeMO. Each row has one connector.
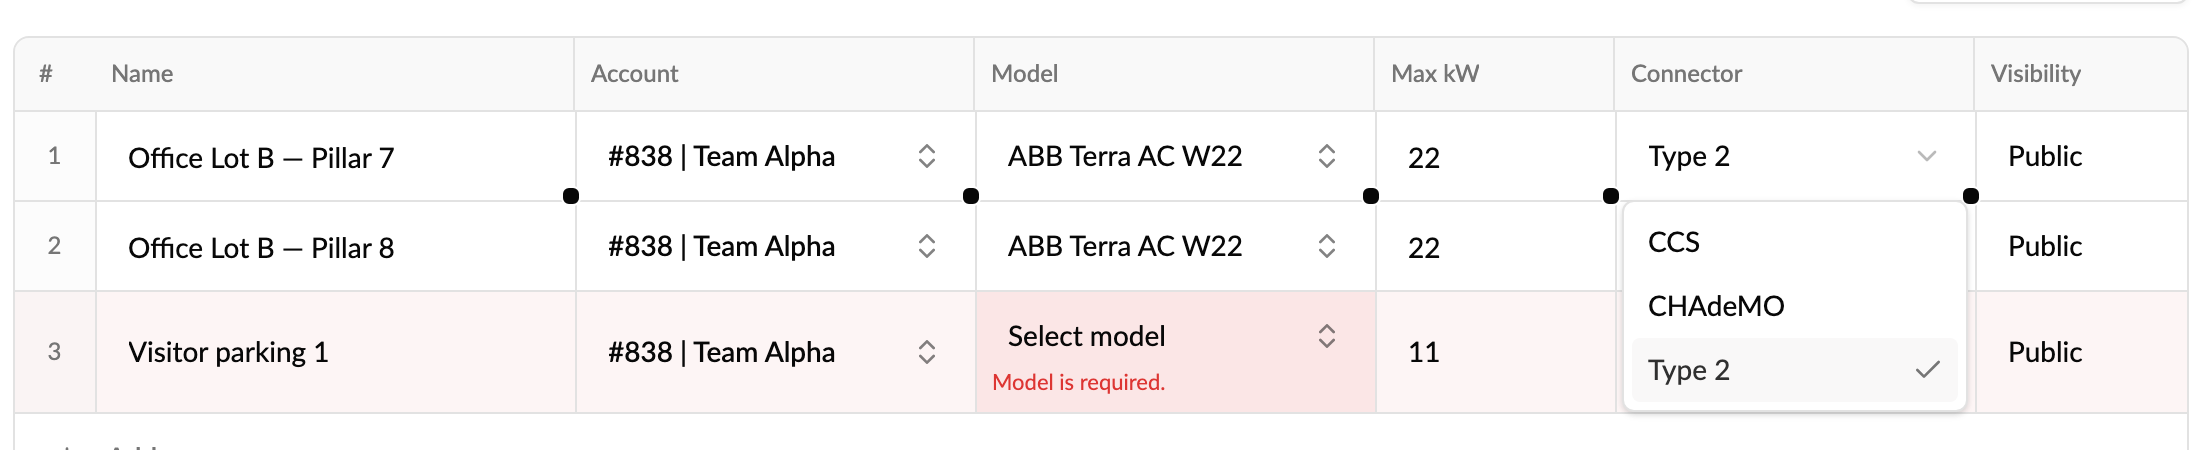
- A row without a connector, or a file without the column, gets Type 2.
- In a file, the Connector column takes the connector's number, not its name:
1is Type 2. For other plug types, the simplest is to upload the file and then pick the plug type in the grid, and drag it down to the rows below. - Don't confuse it with Connector ID, which is the socket number on the charger for OCPP.
How is the location chosen?
- If you pick an existing Location, the EVSE is added there and any address in the row is ignored.
- Otherwise, enter an address. Monta Hub matches it to a real address before you import. If it can't, the row shows No matching address found. Correct the address and click Re-check.
- Add a Location name to create a new location at that address. Rows with the same account, location name and address share one new location.
- Each row needs either an existing location or an address.
How do I edit and check the rows?
- Copy a value down: click a cell and drag the small handle in its bottom-right corner over the rows below.
- Check status: each row shows Valid or Error, and an error explains what to fix under the cell. The counters at the top show how many rows are valid and how many have errors.
- Remove rows with errors drops the rows you don't want to fix now. Hover over a row to remove just that one (this doesn't delete anything that already exists).
- Re-check matches the addresses again after you've corrected them.
What happens when I import?
- Click Import. The button shows how many valid rows will be imported.
- A progress screen shows how many rows have succeeded and failed so far. You can leave the page; Monta Hub tells you when it's finished.
- The results list every row as Imported or with the reason it failed.
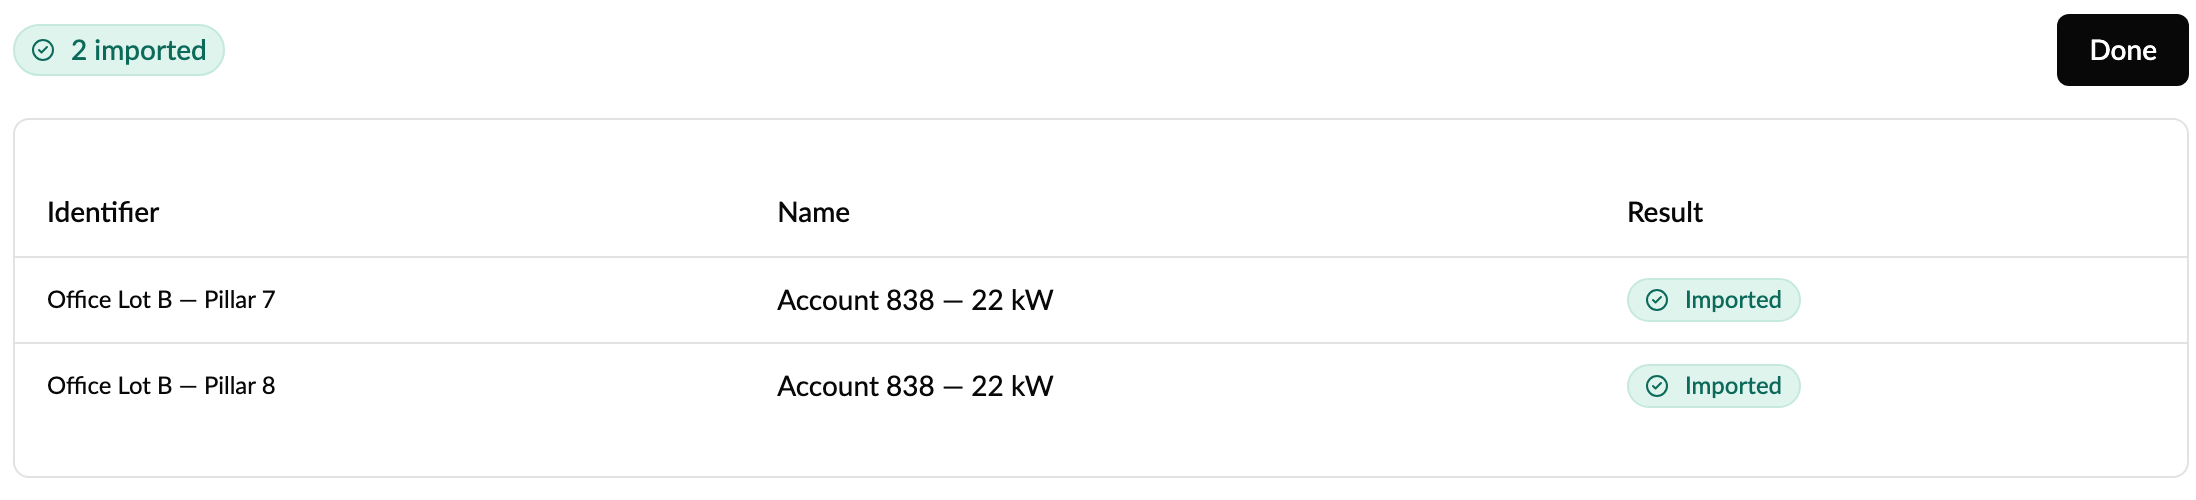
- If some rows failed, Fix and retry takes you back to the grid with only those rows, each showing its error.
- When everything is imported, Done takes you to the EVSE list, where the new EVSEs appear.
- There's no confirmation email. The results on screen are the confirmation.
What kind of file can I upload?
- A .csv or .txt file of up to 10 MB.
- Columns separated by commas, semicolons or tabs. Monta Hub detects which.
- Values with a comma in them, like an address, must be in quotes:
"Main St 1, Copenhagen". - Save the file as UTF-8 so letters like æ, ø and ü come through correctly.
- If the first line doesn't contain recognisable headers, columns are read in the template's order. Columns Monta Hub doesn't recognise are ignored.
Good to know
- Re-creating a deleted charge point? You can reuse its EVSE ID on a new charge point in the same account, and roaming partners keep seeing the same EVSE ID. An EVSE ID that's still used by an active charge point, or by a deleted charge point in another account, can't be reused.
- Imported EVSEs are not active and not shown on the map unless you set Active and Show on map to Yes. Inactive EVSEs don't accept charging sessions.
- There's no duplicate check. Importing the same rows twice creates the EVSEs twice.
- Several rows can belong to one charger with several sockets: give them the same OCPP identifier and a different Connector ID each.
How do I connect the charge points?
- With an OCPP identifier in the import: the EVSE is linked to that identifier straight away, and comes online as soon as the charger connects to Monta.
- Without one: select the EVSEs in the EVSE list and use Connect in the bar at the bottom, or connect each EVSE from its own page.
- With an installer on site: create an installer job. On the location's page, click Create installer job, then View installer job. You can also go to CPO / Network → Installer jobs and click New. In the job, check each charge point's identifier and connector, then share the job's Public link with the installer.